Violin Notes — 01 · Grade 1 First Steps & Repertoire
Grade 1 ABRSM violin is where fingers meet strings. The syllabus is small but the techniques inside are foundational: 1st position fingering, three major keys (G, D, A), one-octave scales, basic bowing (détaché and slur), and a handful of short pieces that you'll remember decades later.
Series map: 00 Beginner → 01 Grade 1 (this post) → 02 Grade 2 → … → 08 Grade 8.
Learning Outcome
- Place fingers 1, 2, 3, 4 in 1st position on all four strings.
- Play one-octave scales of G, D, A majors (separate bows).
- Play one-octave arpeggios for the same keys.
- Read fluently in treble clef across the first 1.5 octaves above Middle C.
- Use détaché (separate) bowing cleanly.
- Begin to feel "in tune" — recognise when a finger placement is sharp or flat.
- Play 3–5 Grade 1 / Initial Grade pieces with hands together.
Chapter 1 — 1st Position fingering
What "1st position" means
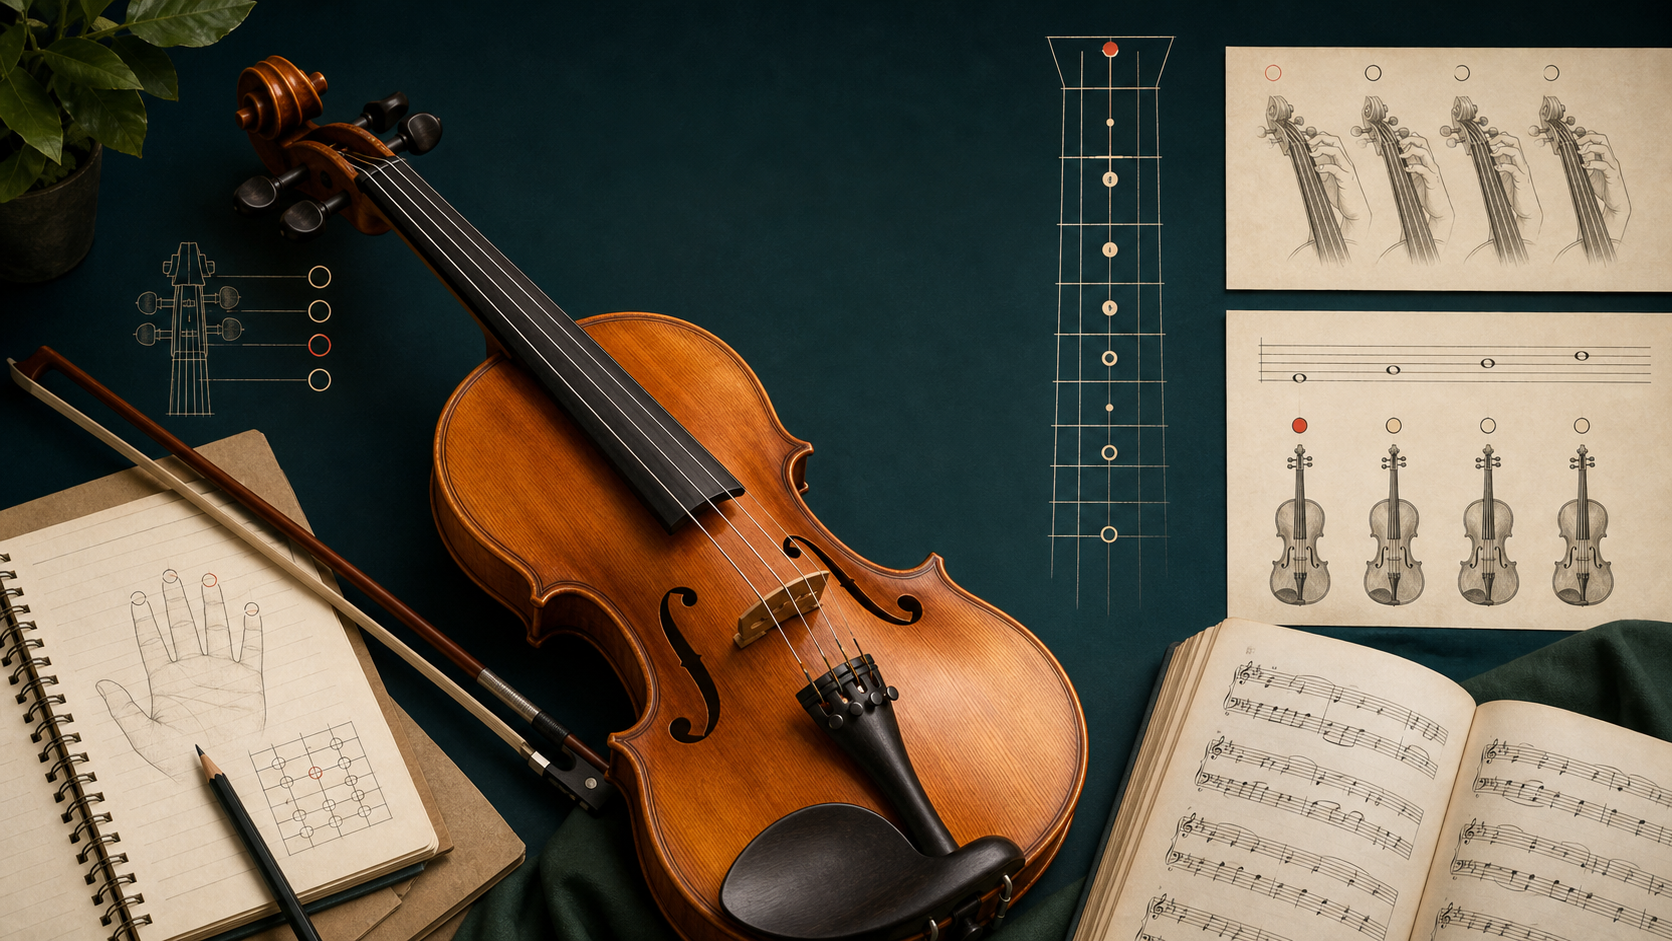
The position number tells you where the first finger sits on the fingerboard. In 1st position, the index finger sits just below the nut — about a whole tone above the open string. From there, fingers 2, 3, 4 extend up the fingerboard, each roughly a whole tone apart (with one half-step adjustment per scale).
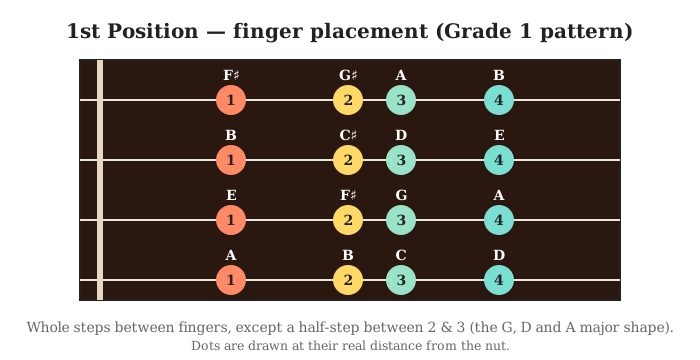
The diagram shows the Grade 1 pattern: whole steps between the fingers, except a half-step between fingers 2 and 3. In other keys, the half-step location shifts (Chapter 3).
Finger numbering
| Finger | Number |
|---|---|
| Index | 1 |
| Middle | 2 |
| Ring | 3 |
| Little (pinky) | 4 |
| (Thumb supports underneath, no number) | — |
This is opposite to piano — there, the thumb is 1. On the violin, the thumb has no number because it never stops a string; its job is to brace the neck.
Trick: coming from piano, I kept calling my thumb "finger 1" and reaching with my index expecting it to be "2". The fix: every Grade 1 piece marks "1" above the index. Trust the printed number, not your old habit.
Placing fingers cleanly
- Fingertip down, not the pad — the smaller contact area produces a cleaner stop.
- Curved finger — knuckles bent.
- Just enough pressure to stop the string vibrating above the finger. Too much pressure = sharp pitch + finger fatigue.
- Drop and lift — don't slide. Vertical motion only.
Where I got stuck: I pressed every finger too hard for two months. My left hand cramped after 10 minutes. The fix: deliberately under-press until the note buzzes; then add the minimum extra pressure to stop the buzz. That's the right amount. Most students press 2-3× more than needed.
Chapter 2 — Tuning revisited (the violinist's ear)
You learnt to tune in Post 00. Grade 1 adds double-stop tuning — bow two adjacent open strings together and listen for the perfect 5th.
How a perfect 5th sounds
When two strings tuned a perfect 5th apart sound together, the combined tone is smooth and ringing. When slightly off, you hear beats — a wobbling, rough pulse like an out-of-sync washing machine.
To tune by 5ths:
- Tune A to A=440 with a tuner.
- Bow A and D together gently. Adjust D's fine tuner until beats vanish.
- Bow D and G together. Adjust G.
- Bow A and E together. Adjust E.
Trick: sit in a quiet room. Beats are easier to hear without background noise. After 6 months of tuning by 5ths, you'll do it automatically — and you'll have built a perfect-5th template in your ear that helps every interval recognition exercise.
Chapter 3 — The three Grade 1 scales
G major (one octave, G string + D string)
Open G → 1st finger A → 2nd finger B → 3rd finger C → open D → 1st finger E → 2nd finger F♯ → 3rd finger G.
1
2
3
G string: G 1=A 2=B 3=C
D string: D 1=E 2=F♯ 3=G
Half-step location: between finger 2 and finger 3 on each string. (B→C and F♯→G are half-steps.)
D major (one octave, D string + A string)
Open D → 1 E → 2 F♯ → 3 G → open A → 1 B → 2 C♯ → 3 D.
1
2
3
D string: D 1=E 2=F♯ 3=G
A string: A 1=B 2=C♯ 3=D
Half-step location: between finger 2 and finger 3 again.
A major (one octave, A string + E string)
Open A → 1 B → 2 C♯ → 3 D → open E → 1 F♯ → 2 G♯ → 3 A.
1
2
3
A string: A 1=B 2=C♯ 3=D
E string: E 1=F♯ 2=G♯ 3=A
Same half-step pattern.
Trick: G, D, A majors all use the same finger pattern in 1st position: 0-1-2-3 with the half-step between 2 and 3 on each string. Memorise one hand shape; transfer to all three keys. This is the "violin equivalent" of the piano's W-W-H-W-W-W-H — but expressed as finger placement.
Arpeggios (Grade 1)
The tonic triad spelled out: root, third, fifth, octave.
1
2
3
4
5
6
7
8
G major arpeggio: G B D G D B G
(open) (2) (open) (3) (open) (2) (open)
G str G str D str D str D str G str G str
D major arpeggio: D F♯ A D A F♯ D
A major arpeggio: A C♯ E A E C♯ A
Practise scales and arpeggios in pairs: G major scale → G major arpeggio → G again. Builds the key-feel.
Chapter 4 — Bowing: détaché and slur
Détaché
"Detached" — each note gets its own bow stroke (down or up). The bow doesn't lift between notes; it changes direction on the string.
In Grade 1 you play almost everything détaché. Goal: smooth, even tone with no scratching at the bow direction change. The wrist makes a tiny "give" at each change, like a pendulum bottom.
Slur
A curved line over two or more notes means play them in one bow stroke (one direction, no change). Same hair, multiple finger changes.
1
2
3
♪ ♪ (no slur) = two separate bows: down-up
♪‿♪ (slurred) = one bow stroke, both notes
Where I got stuck: I scratched every bow change for the first 2 months. Fix: practise the bow change motion itself without a string — just air bow with the empty bow, smoothly reversing direction. The wrist learns to soften the change. Then add the string back.
Bow distribution
On a slur of 4 notes, you have to "ration" the bow length so you don't run out. Roughly: divide the bow into 4 equal parts; one part per note.
Practice: slur 2 notes per bow, then 4, then 8. By Grade 3 you'll be slurring entire scales in one bow.
Chapter 5 — Reading music for violin
Violin reads in treble clef only (unlike the piano, which uses both). Range covers from open G (below the staff, under two ledger lines) up to many ledger lines above. By Grade 1 you read up to about A or B above the staff (3rd finger on E string).
Notes you'll meet in Grade 1
| Note | Where on violin |
|---|---|
| G3 | Open G string (lowest) |
| A3 | 1 on G |
| B3 | 2 on G |
| C4 | 3 on G |
| D4 | Open D |
| E4 | 1 on D |
| F♯4 | 2 on D |
| G4 | 3 on D |
| A4 | Open A |
| B4 | 1 on A |
| C♯5 | 2 on A |
| D5 | 3 on A |
| E5 | Open E |
| F♯5 | 1 on E |
| G♯5 | 2 on E |
| A5 | 3 on E (top note Grade 1) |
Trick: when sight-reading a Grade 1 piece, mark the string and finger above each note in pencil for the first read. After 3 plays through, erase the markings — your hand has memorised the pattern. By the end of Grade 1 you should be doing this in your head, not on paper.
Chapter 6 — Suggested Practice Pieces
These pieces match Grade 1 / Initial Grade. Most are in Suzuki Violin School Vol. 1 or freely available on IMSLP.
Suzuki Vol. 1 staples (Grade 1 level)
| Piece | Composer / Source | Why |
|---|---|---|
| Twinkle Variations | Suzuki arr. | The canonical first piece. Same melody, 5 bowing variations. Teaches bow control by rhythm |
| Lightly Row | German folk | Open-string-heavy, simple finger work |
| Song of the Wind | German folk | Tests left-hand independence early |
| Go Tell Aunt Rhody | American folk | Slow, beautiful, teaches singing tone |
| O Come, Little Children | German folk | Two-string crossings, simple |
| May Song | German folk | First feel of dance-rhythm |
| Long, Long Ago | T. H. Bayly | Lyrical; first time you'll want to add vibrato (resist until Grade 3) |
| Allegro | Suzuki | Energetic; tests détaché bowing speed |
ABRSM Grade 1 alternatives
| Piece | Composer | Why |
|---|---|---|
| Minuet No. 1 in G | Bach (attr.) | Classical entry; same tune as piano students play |
| Russian Dance | Various | Folk dance feel, simple |
| Lavender's Blue | English folk | Lyrical, classic |
How to study a piece
- Listen to a recording 3 times before touching the violin.
- Sight-read pizzicato (pluck the strings) — checks left-hand alone before the bow complicates it.
- Bow slowly — 1/4 of target tempo with metronome.
- Hands together at tempo — only once you can play each separately without thinking.
- Memorise the first 4 bars by week 1.
Trick: always say note names aloud as you play during slow practice. The voice + hand link locks the note-name-to-pitch connection. Later you'll do this silently, but the verbal pass is the cement.
Chapter 7 — Intonation: the violin's hardest problem
Unlike piano (perfect pitch every key), violin pitch depends entirely on where your finger lands. Even 1 millimetre off = audibly out of tune.
How to develop intonation
- Listen to open strings constantly. Cross-check stopped notes against open strings of the same name.
- Drone practice. Bow an open string, then play a scale on the next string. The open string is your reference; stopped notes that match the harmonic ring are in tune.
- Use ear-training apps. "Tonal Energy", "Functional Ear Trainer".
- Sing the note first, then play it. Singing pre-tunes your hand.
Where I got stuck: I couldn't tell if I was sharp or flat — everything sounded "kind of right". Fix: bow the open A while pressing 4th finger on D (which should match A). If the two pitches fight — beats appear — I was off. If they fuse into one ringing tone — in tune. After a month of drone practice, my finger landed correctly without conscious thought.
Tape on the fingerboard (controversial but works)
Many teachers put small pieces of tape across the fingerboard at the 1st, 3rd, and 4th finger positions for absolute beginners. Provides a visual guide for finger placement.
Pros: speeds up first 3 months; reduces frustration.
Cons: trains eyes-on-fingerboard habit; must be removed by Grade 2 or it becomes a crutch.
Use it if you're self-teaching and frustrated. Remove it as soon as you can hit the notes without looking. By Grade 1 exam, no tape.
Chapter 8 — Aural / Listening Skills
ABRSM Grade 1 violin aural is identical to piano aural at Grade 1:
- Clap back a 2-bar rhythm in 2/4, 3/4, or 4/4.
- Sing back a 3-4 note phrase.
- Identify the time signature by listening to a tune.
Violin-specific aural exercise
- Match pitch — examiner plays a note on the piano; you play it on the violin. Tests pitch perception + finger placement under pressure.
- Tuning judgment — examiner plays two notes; you say which is higher or whether they're the same.
Trick: practise pitch matching daily for 60 seconds. Pick a random note on a piano (or use a tuning app), then find it on your violin. By Grade 1 exam you should hit within a quarter-tone first try.
Chapter 9 — Common Grade 1 Pitfalls
| Pitfall | Fix |
|---|---|
| Finger lands but is flat (too low) | The half-step between 2-3 means 3 is close to 2. Beginners leave too much space. Tape or drone-check |
| Scratching on bow change | Wrist softens the change; slow practice with only bow change drill |
| Squeezing the bow | Fingers curved + relaxed. Test: can you wiggle them slightly while bowing? If no, you're squeezing |
| Looking at fingers, not music | Cover the fingerboard with a small towel for one passage. Force eyes onto the staff |
| Tuning by guess | Always tuner-first the first 6 months. Ear comes with practice in tune, not from guessing |
| Practising for too long | 20-25 min focused beats 45 min tense. Stop when bow gets shaky |
| Skipping the bow exercises | Open-string warm-up is non-negotiable. 5 min daily for the first year |
Useful Shortcut
Cheat-sheet
| What | How |
|---|---|
| 1st position fingering | 0=open, 1=index, 2=middle, 3=ring, 4=pinky |
| Half-step location (G/D/A major) | Between finger 2 and 3 on each string |
| Détaché | Each note its own bow stroke, no lift |
| Slur | Curved line = one bow stroke over multiple notes |
| Bow distribution rule | Divide bow into N equal parts for N notes |
| Drone tuning | Bow open string + stopped same-name note; should ring as one |
| Open strings (low → high) | G D A E |
| Range Grade 1 | G3 (open G) up to A5 (3rd finger on E) |
Daily routine (30 min)
| Block | Time | Content |
|---|---|---|
| Tune | 2 min | Tuner + 5th check |
| Bow warm-up | 5 min | Long bows on each open string + crossings |
| Scale | 6 min | Today's key (G, D, or A) major scale + arpeggio |
| Sight-read | 3 min | New 8-bar piece each day |
| Repertoire | 12 min | Current Suzuki / ABRSM piece, slow practice |
| Cool-down | 2 min | Open A, long bow, listen to tone, end on clean sound |
Suggested listening (context)
| Piece | Performer | Why |
|---|---|---|
| Suzuki Violin School Vol. 1 | (recordings on most streaming services) | Every Suzuki student listens to the album order while learning |
| Sonata No. 1 in G | Bach / Hilary Hahn | Aspirational; the violin's solo voice at its finest |
| Air on the G String | Bach / Itzhak Perlman | Only the G string used — perfect for hearing tone shaping |
| Méditation from Thaïs | Massenet / Sarah Chang | Long lyrical line; what every Grade 1 student secretly wants to play |
| Czardas | Monti / various | Aspirational virtuoso; impossible at Grade 1 but plant the seed |
References
- ABRSM (current). Music Theory in Practice — Grade 1. (Theory paper, same as piano students.)
- ABRSM (current). Violin Exam Pieces — Initial / Grade 1.
- Suzuki, S. Suzuki Violin School, Vol. 1.
- Simon Fischer, Basics: 300 Exercises and Practice Routines for the Violin. (Drill book; reference throughout the grades.)
- IMSLP — public-domain scores for Bach, German folk pieces, Vivaldi.
- Sevcik, Op. 1 & Op. 2 — classic violin technique studies (slightly beyond Grade 1 but worth knowing about).
Note: this post is in progress. Planned additions: audio reference per piece, video of correct vs incorrect 1st-position hand shape, tape-fingerboard guide.