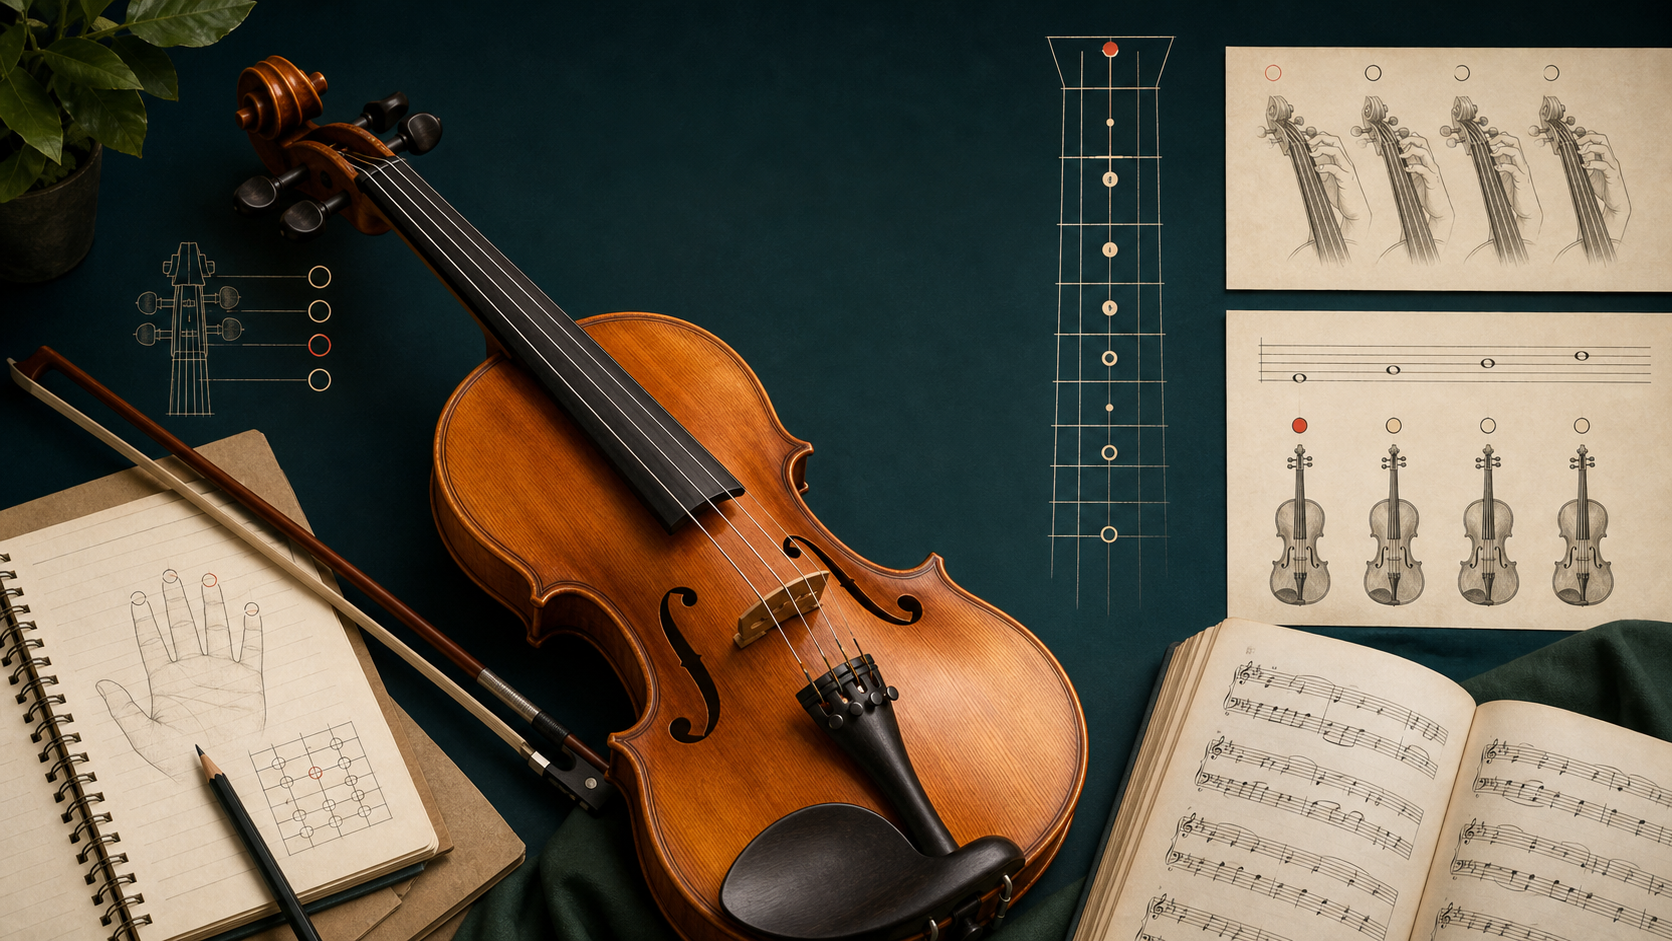
Violin Notes — 00 · Beginner Basics & Your First Sound
The first post in a self-study violin series. Goal: by the end you can hold the violin without straining, name every open string, draw a straight bow that makes one sustained tone, and play three short open-string pieces. The violin is harder than the piano at the start — there's no "pressed key = right pitch" guarantee — but the payoff is the most expressive single-line instrument we have.
Series map: 00 Beginner (this post) → 01 Grade 1 → 02 Grade 2 → 03 Grade 3 → 04 Grade 4 → 05 Grade 5 → 06 Grade 6 → 07 Grade 7 → 08 Grade 8.
Learning Outcome
- Hold the violin with relaxed posture, no shoulder hunching.
- Hold the bow with the correct grip and produce a straight stroke.
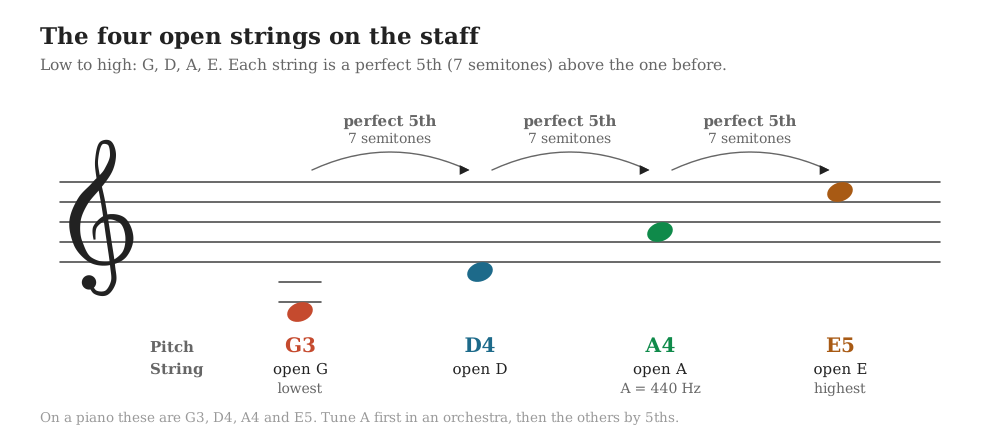
- Name the four open strings (G, D, A, E) low to high and find them on the staff.
- Tune with a clip-on tuner or app.
- Play three open-string exercises that produce a clear, ringing tone.
- Understand the difference between violin, viola, cello, and double bass — pick the right one.
Chapter 1 — Why violin (and why now)
The violin produces sound by drawing horsehair across a string. Unlike the piano (where the pitch is fixed by the keyboard), every note on the violin is unfretted — you place your finger somewhere and the precision of placement decides whether it's in tune or sour. The first six months are essentially an ear-training course in disguise.
In return: the violin gives you the most direct path to the human singing voice. Phrasing, vibrato, bow weight — all of it shapes a single line in ways no fretted or keyed instrument can match.
Where I started: I almost quit in week three because my own playing sounded scratchy. The fix wasn't talent — it was bow weight and bow speed (Chapter 5). Sound quality is mechanical first, expressive later. Don't blame your ear; blame the bow contact point.
Chapter 2 — Picking an instrument
Size matters first
Violins come in fractional sizes for children: 1/16, 1/8, 1/4, 1/2, 3/4, 4/4 (full). Adults use 4/4 unless they have unusually short arms. Measure from neck-base to the centre of the palm with arm extended:
| Arm length (neck to palm) | Size |
|---|---|
| < 36 cm | 1/8 |
| 36–43 cm | 1/4 |
| 43–48 cm | 1/2 |
| 48–55 cm | 3/4 |
| ≥ 55 cm | 4/4 (full) |
What to buy as an adult beginner
A "beginner outfit" includes: violin, bow, case, rosin, shoulder rest. Brands in the $200-$500 range that don't disappoint:
- Yamaha V3, V5, V7 — reliable workhorse, well-set-up.
- Stentor Student II, Conservatoire — UK-popular student line.
- Cremona SV-175, SV-500 — entry-level, decent set-up.
- Eastman VL80, VL100 — Chinese workshop, often resold by reputable shops.
Avoid $50-$100 Amazon "VSO" (Violin-Shaped Object) instruments — they're often un-tuneable, with cheap pegs that slip and bridges that are wrong.
Accessories you'll definitely need
| Item | Notes |
|---|---|
| Rosin | Light or dark; "Pirastro Goldflex" or "Hidersine" are safe starts |
| Shoulder rest | Kun, Everest, Bonmusica — try in person if possible |
| Tuner | Clip-on (Snark, KLIQ) or phone app (Tunable, Cleartune) |
| Music stand | Foldable, cheap. Use it from day one |
| Metronome | App fine. Essential by week 4 |
| Spare strings | Dominant or Tonica brand for first replacement |
| Soft cloth | Wipe rosin dust off strings + body after every session |
Trick: the violin shop visit is worth it even if you order online. Spend 30 minutes at a real shop trying setups in your size range. Your ear immediately tells you which one rings — pay the extra $100 for the one that sings. Cheap-and-dull will discourage you within a month.
Chapter 3 — The instrument anatomy
1
2
3
4
5
6
7
8
9
10
11
12
13
14
15
16
17
18
19
20
21
22
23
24        ┌── scroll
        │
       ╭┴╮
       │ │ ← pegs (4, one per string)
       │ │
       ├─┤ ← nut
       │ │
       │ │ ← fingerboard (where you press)
       │ │
       │ │
   ╭───┴─┴───╮ ← upper bout
   │  ┌────┐ │
   │ ┌┴────┴┐│
   │ │  ╱ ╲ ││ ← f-holes
   │ │ ╳━━━╳ ││ ← bridge
   │ │ ╳━━━╳ ││ ← strings (G D A E from low to high)
   │ │  ╲ ╱ ││
   │ └┬────┬┘│
   │  └────┘ │ ← lower bout
   ╰────╥────╯
        ║ ← chinrest (under chin)
       tail ← tailpiece holds strings
       button
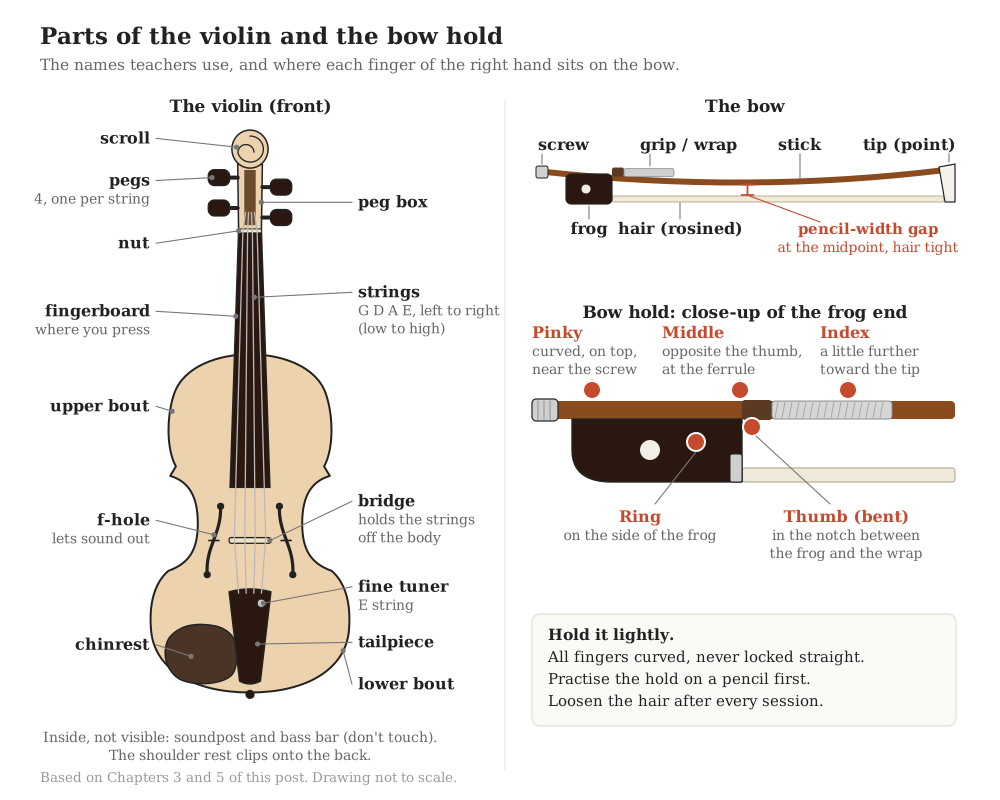
Key parts to know by name (you'll hear teachers say these):
- Scroll, pegs, peg box — top, where strings wind around tuning pegs
- Nut — small ridge where strings cross from peg box to fingerboard
- Fingerboard — the long black wooden strip your fingers press
- Bridge — small wooden arch that holds strings off the body and transmits vibration
- F-holes — the two carved openings; let sound out
- Soundpost — small wooden dowel inside the violin between top and back plates. Critical for tone. Don't touch.
- Bass bar — wooden strip glued under the top plate. Also don't touch.
- Tailpiece — anchors the strings at the bottom
- Fine tuners — small screws on the tailpiece for precise tuning (your E string almost always has one; the others may or may not)
- Chinrest — where your chin rests
- Shoulder rest — clips onto the back, sits on your shoulder
Chapter 4 — Posture and how to hold the violin
Posture is everything. Get this wrong and you're fighting your own body for years.
Standing
- Feet shoulder-width apart, weight on both.
- Spine tall, shoulders relaxed (not hunched, not pulled back).
- Head facing forward, then turn it slightly left to look down the fingerboard.
- Place the violin on your left collarbone, chin gently on the chinrest, shoulder rest cushioning underneath.
- The violin should stay in place when your left hand drops — don't grip with your jaw. The shoulder rest does the work.
Where I got stuck: I clamped my jaw on the chinrest for six months and developed neck pain. Fix: adjust the shoulder rest higher until your jaw can rest light, like resting your chin on a friend's shoulder for a slow dance. The violin is supported, not gripped. Two weeks of correct setup undoes the bad habit.
Sitting
Same upper-body posture. Sit on the front half of the chair, both feet flat. Cellists slump; violinists must not — gravity pulls the violin off the shoulder if you slouch.
Left-hand position
- Thumb rests on the side of the neck, around the same level as the first finger.
- Fingers curve over the strings.
- Wrist straight — neither collapsed inward nor pushed out.
- A peace-sign gap visible between the neck and the base of the index finger.
Common mistakes:
- Wrist collapsed under the neck (the "frying pan grip") — kills agility.
- Thumb wrapped over the top of the fingerboard — guitar players do this; violinists can't.
- Fingers flat on the strings — must be curled, fingertips down.
Chapter 5 — The bow
Anatomy of the bow
1
2
3
4
5
6
7
frog tip
╔══╗═══════════════════════════════════════════════════════════════════════╗
║ ║ hair (horsehair, rosined) ║
╚══╝═════════════════════════════════════════════════════════════════════════╝
↑ ↑
thumb area point/tip
- Stick — wood (Pernambuco traditionally, carbon fibre common today)
- Hair — horsehair, needs rosin to grip strings
- Frog — black bottom piece where the screw lives
- Screw / button — adjusts hair tension
- Tip / point — top end
- Grip / wrap — leather + silver winding around the stick near the frog
Bow hold (the most important 5 minutes of your beginner life)
- Pick the bow up at the frog with your right hand.
- Thumb bent, tip placed in the notch between the frog and the wrap.
- Middle finger opposite the thumb, around the frog ferrule.
- Ring finger rests on the side of the frog.
- Pinky curved on top of the stick, near the screw.
- Index finger wraps around the stick a little further toward the tip, controlling weight.
All fingers curved, never locked straight. The grip is light — too tight and the bow can't move.
Trick: practise the bow hold on a pencil first. Hold the pencil where the bow stick would be. If you can do it without thinking — then pick up the actual bow. Mid-week 1, your hand is still learning the geometry; don't waste bow hair on dropped bows.
Tightening the bow
Turn the screw clockwise. The hair should be tight enough that a standard pencil fits between hair and stick at the midpoint. Too tight = warps the stick over time + tone gets harsh. Too loose = the stick touches the strings.
Always loosen after every session (a few turns counter-clockwise). Storing tight ruins the stick's camber.
Rosin
Cake of tree resin. Run the bow hair across it 10-20 times before every session. New bows or freshly-rehaired bows need 30-50 strokes the first time. Without rosin, the hair slips silently across the string and makes no sound. Too much = squeaky, dusty tone.
Chapter 6 — Tuning
The four strings, low to high: G — D — A — E. Each interval is a perfect 5th (7 semitones). On a piano: G3, D4, A4, E5.
With a clip-on tuner or app
- Clip tuner to the scroll or peg box.
- Pluck or bow each string one at a time.
- Read pitch. If sharp, lower; if flat, raise.
Coarse tuning with pegs (large adjustments)
Pegs are friction-fit — turn while pushing into the peg box. If you only turn, the peg slips back. Push-and-turn together.
- Turn away from you (top of peg moves forward) = string winds up = pitch rises.
- Turn toward you = pitch falls.
Small turns. Pegs are sensitive. Tune the G first, then D, A, E.
Fine tuning (small adjustments)
The little screws on the tailpiece. Turn clockwise to raise pitch, counter-clockwise to lower. Use these for daily small corrections (< quarter-tone).
Where I got stuck: I terrified myself snapping a string in week one. Fix: tune slowly and small. If a string is way off, raise it gradually, not in one big peg crank. Snapped strings are normal — buy a backup E string ($5) and stop being afraid.
Tuning A first (orchestral convention)
In orchestral settings, tune A first (because the oboe gives an A). Then tune D, G, E by listening for perfect fifths with the open A. This is your first ear-training exercise — when the two strings are exactly a 5th apart, the combined sound is clean. When slightly off, you hear "beats" — a wobbling pulse.
Chapter 7 — Your first sound: open-string bowing
Before fingers go on strings, master pulling a clean tone on each open string.
The straight bow
The bow must move perpendicular to the strings (parallel to the bridge). If it angles toward the fingerboard or the bridge, the contact point changes and the tone breaks up.
Practice exercise:
- Place the bow flat on the A string, about halfway between bridge and fingerboard.
- Slowly pull a downstroke (bow moving from frog toward tip). Count "1-2-3-4".
- Pause. Reset. Upstroke (tip toward frog). Same count.
- Watch the bow in a mirror — is it staying parallel to the bridge?
Contact point
Three knobs control your sound:
- Weight — how much the bow presses down (mostly from the index finger via the stick)
- Speed — how fast the bow moves
- Contact point — distance from the bridge (closer to bridge = louder + sharper; closer to fingerboard = softer + warmer)
Balance these three. A faster bow needs more weight to maintain pressure. A bow close to the bridge needs slower speed to avoid scratching. The "sweet spot" for a clean, warm tone is about 1.5–2 cm from the bridge for a normal mezzo-forte dynamic.
Analogy: think of the bow like painting. Speed is how fast you move the brush. Weight is how hard you press. Contact point is which part of the paper you're stroking. Change any one and the paint stroke changes. Beginners change all three accidentally and produce a mess. Master one knob at a time.
Three first exercises
Exercise 1 — Long bows on each string
Whole bow length, 8 beats per stroke. Down-up-down-up on each string in turn: G, D, A, E. Listen for a clean, sustained tone with no scratches or wobbles. Five minutes daily.
Exercise 2 — String crossings
Bow A for one beat, then D for one beat. The forearm rotates from elbow; wrist stays neutral. Do A-D-A-D-A-D, then D-A-D-A. Then add G-D and A-E. Tests bow-arm coordination without fingers complicating things.
Exercise 3 — "Hot cross buns" (open strings only)
The melody fits perfectly on three open strings if you treat it as A-D-A-D-G-D-A. Just bow each string in the rhythm of the tune. You'll feel embarrassed playing nursery rhymes — and then proud, because you sound musical.
Chapter 8 — How to practise
The single most important rule: slow and small reps beat fast big ones. Five minutes of focused open-string bowing teaches more than thirty minutes of trying to play melodies you can't yet.
Daily routine, ~25 minutes
| Block | Time | What |
|---|---|---|
| Tune | 2 min | Tuner first, then check by ear |
| Bow hold check | 2 min | Hold + release the bow on a pencil 5 times |
| Open-string long bows | 8 min | All 4 strings, full bow, 8 beats per stroke |
| String crossings | 5 min | A-D, D-A, G-D, A-E |
| Exercise piece | 5 min | One short pattern (open strings only this month) |
| Cool-down | 3 min | Play any open string slowly, listen to the tone, end on a clear sound |
Slow practice rules
- No scratch, no rush. If the tone is bad, slow down.
- One thing at a time. Bow speed or bow weight or contact point — not all three at once.
- Mirror. Use a mirror or phone front-camera for 5 min per session for the first 3 months. The eye catches what the hand doesn't.
- Stop before fatigue. Tired = tense = bad habits. Better to stop at 20 minutes feeling fresh than 45 minutes feeling done.
Trick: after every session, record 30 seconds on your phone. Open string, long bow, full attention. Listen back. Week 1 will sound rough. Week 8 will sound transformed. The recording is your honest progress meter when your ears in the moment lie.
Chapter 9 — Common beginner mistakes
| Mistake | Fix |
|---|---|
| Crooked bow (drifts toward fingerboard) | Mirror practice. Mark the bridge-side bow lane with tape on your bow if needed |
| Death-grip on the bow | Lay the bow on your palm, close the fingers gently, lift. Fingers curved, never locked |
| Pressing the string too hard with left fingers | The fingertip just needs to touch the string firmly enough to stop it vibrating above. Test by pressing with minimum force until the note is clean |
| Shoulder hunching | Drop the shoulder. Reset every minute. If pain appears, the shoulder rest needs adjusting |
| Loose bow hair | Tighten before playing, loosen after. Storage in tight position warps the stick |
| Forgetting to rosin | The hair must be coated. New hair = many strokes; daily = a few |
| Tuning by guess | Always use a tuner the first 3 months. Ear training comes from playing in tune, not from guessing |
| Practising past pain | Stop. The violin is the most injury-prone instrument. Pain = bad form |
Useful Shortcut
Cheat-sheet
| What | How |
|---|---|
| Open strings (low → high) | G D A E (each a perfect 5th) |
| Tuning reference | A = 440 Hz (orchestral standard) |
| Bow hold thumb | In the notch between frog and wrap |
| Bow hair tension | Pencil fits between hair + stick at midpoint |
| Straight bow | Parallel to the bridge, perpendicular to strings |
| Sound sweet spot | 1.5–2 cm from bridge for mf |
| Practice motto | Slow + clean tone > fast + scratchy |
| End each session | Loosen the bow, wipe rosin off strings + body |
When to move on
You're ready for Post 01 — Grade 1 Theory & Repertoire when you can:
- Tune all four strings with a tuner unaided.
- Produce a clean, sustained tone on each open string for 8 beats.
- Cross strings smoothly without scratching.
- Play "Hot cross buns" or "Twinkle Twinkle" (open-string version) recognisably.
- Hold the violin and bow for 15 minutes without fatigue.
If you're not there yet, stay here another 2-3 weeks. Grade 1 adds fingers; without solid open-string tone, fingered notes will sound worse, not better.
Suggested listening (context, not homework)
These pieces give you a sense of what the violin sounds like at its best. Listen on your commute. The sound shapes your taste; your hands eventually catch up to your ear.
| Piece | Composer | Why |
|---|---|---|
| Méditation from Thaïs | Massenet | The violin singing — what you're aiming for in 3-5 years |
| Largo (Winter, II) from Four Seasons | Vivaldi | Beginner-friendly to your ear; teaches phrasing |
| Air on the G String | Bach | One string only — perfect for hearing tone shaping |
| Salut d'Amour | Elgar | Elegant, simple line, lots of vibrato |
| Méditation from Thaïs — many recordings | (Try Hilary Hahn or Itzhak Perlman) | Compare two performers — you'll start hearing taste differences |
| Suzuki Violin School, Vol. 1 | Various | Listen to the album order if you plan Suzuki method |
References
- ABRSM (current). Violin Practical Syllabus. (Skim the Initial Grade list now.)
- Shinichi Suzuki, Suzuki Violin School, Vol. 1. (Method book; canonical entry point.)
- Carl Flesch, The Art of Violin Playing. (Eventual deep-technique reading; aspirational at beginner level.)
- Ivan Galamian, Principles of Violin Playing and Teaching. (Modern pedagogical bible.)
- Simon Fischer, Basics: 300 Exercises and Practice Routines. (Concrete drills; useful from day one.)
- Yehudi Menuhin, The Violin: Six Lessons. (Short, philosophical, lovely.)
Note: this post is in progress. Planned additions: a side-by-side audio comparison (good vs scratchy tone), embedded short reference video of bow hold, printable practice tracker.